 Pin It
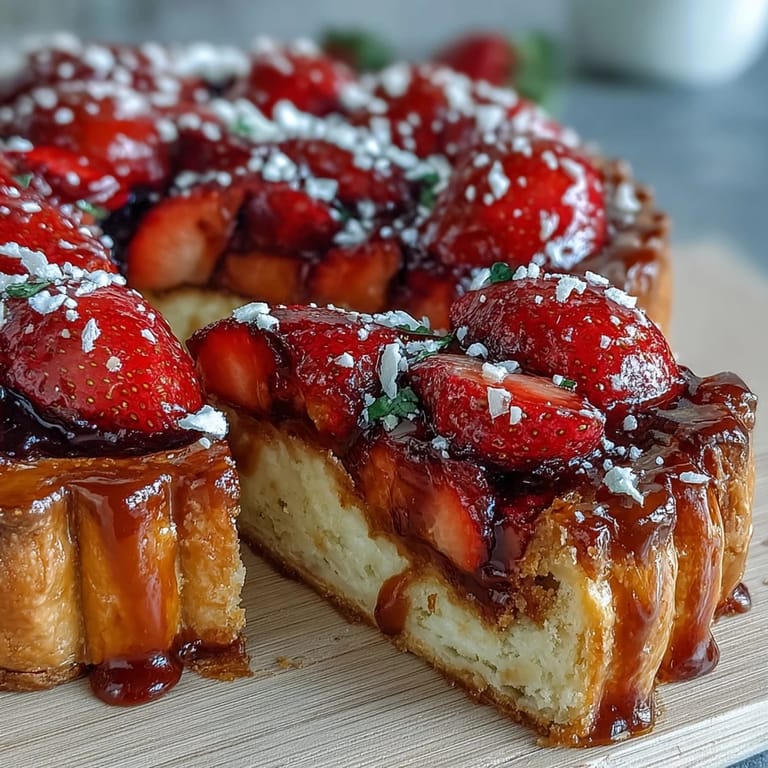
 My neighbor showed up one June morning with a basket of strawberries so ripe they practically glowed, and I had no choice but to make something worthy of them that same afternoon. I'd been intimidated by galettes for years, convinced they required some secret pastry knowledge I didn't possess, but watching the rustic edges come together on my counter shifted something. The frangipane was a revelation—that almond layer turning golden and buttery beneath the berries felt like discovering a hidden room in a familiar house.
I made this for my daughter's book club meeting, nervous about the presentation until everyone took their first bite and went quiet for a moment. That small silence told me everything—sometimes the most powerful meals are the ones that make people pause before speaking. She still requests it whenever she comes home, which says far more than any compliment ever could.
Ingredients
- All-purpose flour: The foundation matters here; measure it by weight if possible to avoid overworking the dough, which toughens the crust.
- Cold unsalted butter: This isn't negotiable—those cold butter pieces create the flaky layers that make pastry sing.
- Ice water: Add it gradually and stop as soon as the dough comes together; every extra drop invites a tough crust.
- Almond flour and sugar for frangipane: This duo creates a delicate, nutty filling that complements strawberries without stealing the show.
- Fresh strawberries: Choose ones that smell fragrant and feel firm; they're doing the heavy lifting here.
- Cornstarch: Just enough to catch the berry juices so they don't make your pastry soggy, nothing more.
- Lemon juice: A small squeeze brightens everything and balances the sweetness perfectly.
- Coarse sugar for finishing: This creates those little pockets of crunch that catch the light and your teeth in the best way.
Tired of Takeout? 🥡
Get 10 meals you can make faster than delivery arrives. Seriously.
One email. No spam. Unsubscribe anytime.
Instructions
- Build your pastry base:
- Mix flour, sugar, and salt together, then work in those cold butter cubes with your fingertips until everything looks like breadcrumbs. This step is where the magic happens—you're creating tiny pockets of butter that will steam into flaky layers. Add ice water one tablespoon at a time, mixing just until the dough barely holds together.
- Chill and rest:
- Press the shaggy dough into a disk, wrap it up, and let it sit in the fridge for at least 30 minutes while you go do something else. The gluten relaxes and the butter solidifies, both of which matter more than you'd think.
- Whip up the almond filling:
- Cream together almond flour, sugar, and softened butter until it's smooth and slightly pale, then add the egg and both extracts. This filling smells like a dream and spreads like velvet.
- Dress your strawberries:
- Toss your sliced berries with sugar, cornstarch, and lemon juice and let them sit—they'll start releasing their juice, which the cornstarch will gently thicken.
- Ready the oven and workspace:
- Heat to 400°F and line your baking sheet with parchment paper so everything can slide right out later without drama.
- Roll and transfer:
- On a lightly floured surface, roll your chilled dough into a 12-inch circle—it doesn't need to be perfect, honestly, the rusticity is the point. Transfer it carefully to your parchment-lined baking sheet.
- Layer your filling:
- Spread that almond frangipane across the center, leaving a 2-inch border of naked dough around the edges. This border is what you'll fold up later to create that beautiful rustic edge.
- Arrange the strawberries:
- Pile your macerated strawberries on top of the frangipane, letting some of the juices drip down. Trust that the cornstarch is doing its job.
- Create the rustic edge:
- Fold the pastry border up and over the filling, pleating it as you go—these folds are supposed to look loose and natural, not neat. Brush everything with milk or cream and scatter that coarse sugar over top.
- Bake until golden:
- Slide it into the oven for 35 to 40 minutes, watching until the crust turns deep golden and you can see the filling bubbling at the edges. The smell alone is worth the wait.
- Cool and serve:
- Let it rest for a few minutes so everything sets slightly, then slice and serve warm or at room temperature. A dollop of whipped cream on the side is optional but I've never regretted it.
 Pin It
 There's a particular moment when a galette comes out of the oven, steam rising from the edges and that first whiff of caramelized strawberries mixing with buttery pastry hitting you all at once, that reminds you why cooking for people matters. It's not just dessert; it's the smell of caring.
Keeping the Crust Crisp
The enemy of a good galette crust is moisture, and strawberries are basically water in fruit form. I learned to drain my strawberries for a few minutes before piling them on if we're talking about particularly juicy specimens, letting gravity do the work. The cornstarch catches what drains and what stays, but starting with less liquid means fewer soggy corners. One small trick that changed everything was brushing the bare pastry with the frangipane itself before adding the berries—it creates a subtle barrier that keeps the crust crisp underneath while the filling cooks.
Berry Variations That Work
While strawberries are classic for a reason, I've had enormous success swapping in raspberries, blackberries, or even sliced stone fruits when they're in season. Blueberries need less cornstarch because they're drier. Peaches are spectacular with the almond filling—something about that combination feels almost too good. The frangipane is flexible enough to dance with almost any summer fruit, as long as you're paying attention to juice content and adjusting the cornstarch accordingly.
Troubleshooting and Next Steps
If your pastry puffs up unevenly or browns too quickly on the edges, it's usually because the oven has hot spots or the galette was rushed into heat before chilling properly. I've learned to rotate my baking sheet halfway through if things are browning unevenly. If you're making this ahead, the assembled galette sits beautifully in the fridge for a few hours before baking, which actually helps everything set and prevents shrinking. The day after, warmed gently in a 300°F oven for five minutes, it's almost better—the flavors have mingled and the texture firms up just right.
- Chill your assembled galette for 15 minutes before baking if you're seeing too much pastry spreading.
- If berries seem super wet on your shopping day, let them drain in a colander for an hour before using.
- This keeps beautifully at room temperature for a day, which makes it perfect for casual entertaining.
 Pin It
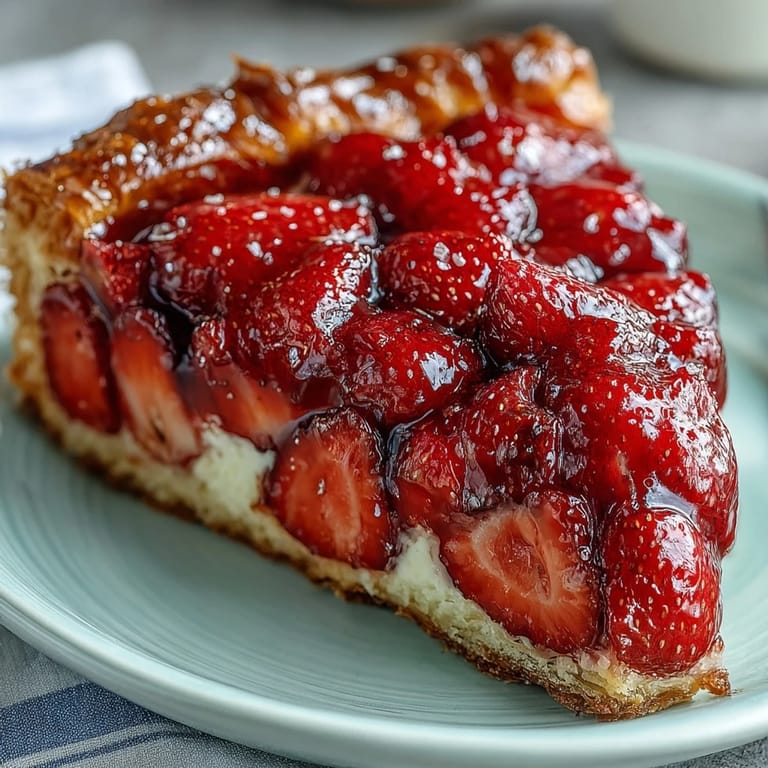
 This galette feels like summer made edible, the kind of dessert that doesn't demand a special occasion to justify making it. Once you understand how it comes together, you'll find yourself making it whenever good fruit shows up.
Recipe FAQs
- → What type of flour is best for the pastry?
All-purpose flour works best to create a tender, flaky crust that holds the galette's shape well.
- → Can I substitute the almond flour in the filling?
While almond flour gives a distinct nutty flavor, ground hazelnuts or cashews can be used as alternatives for a similar texture.
- → How do I prevent the crust from getting soggy?
Chilling the dough before baking and folding the edges tightly help maintain a crisp crust. Also, spreading the frangipane acts as a barrier to moisture from the fruit.
- → What’s the best way to slice the galette?
Allow the galette to cool slightly so the filling sets, then use a sharp knife to cut into wedges for neat slices.
- → Can I use frozen strawberries instead of fresh?
Fresh strawberries provide the best texture and flavor, but if using frozen, thaw and drain excess liquid to avoid a watery filling.
- → Is it possible to make this galette nut-free?
Yes, omit the almond frangipane and spread a thin layer of jam or fruit preserves before adding the strawberries.