 Pin It
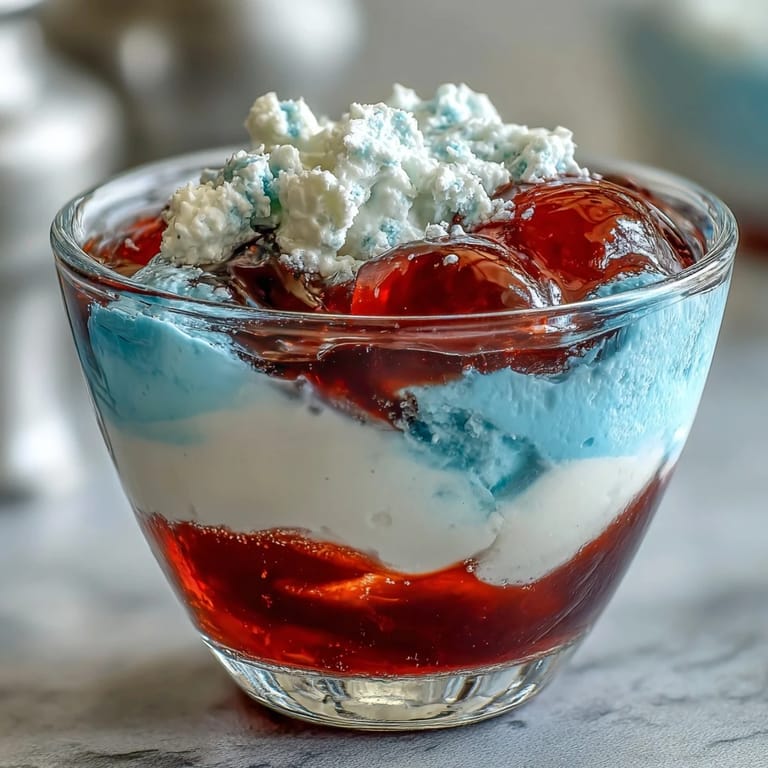
 There's something magical about watching a room light up when you set down a tray of these red, white, and blue layered Jello cups. I learned to make them one Fourth of July when my neighbor challenged me to bring something that actually looked festive instead of store-bought, and I've been hooked ever since. The secret isn't complicated—it's all about patience and letting each layer sit just long enough to set properly. What makes them special is how the colors catch the light, creating these perfect stripes that feel almost too pretty to eat. Almost.
I'll never forget my daughter's graduation party when I made eight of these for forty people, thinking they'd be a nice side dessert. By the time dessert rolled around, someone asked if there were any left, and I realized I'd watched people sneak them throughout the afternoon like they were the main event. That's when I understood these weren't just Jello cups—they were conversation starters in edible form.
Ingredients
- Red Jello (3 oz box, strawberry or cherry): This is your foundation, and choosing between strawberry and cherry actually changes the whole vibe—strawberry feels summery, cherry feels more patriotic.
- Boiling water (1 cup for red, 1 cup for blue): Temperature matters here; if the water cools too much before dissolving, you'll end up with grainy texture instead of that silky smooth finish.
- Cold water (1/2 cup for each colored layer): This stops the setting process and gives you that perfect firm texture without bouncy rubbery Jello.
- Unflavored gelatin (1 envelope): Don't skip the blooming step—letting it sit in cold water for five minutes prevents lumps and ensures a creamy white layer.
- Sweetened condensed milk (1 cup): This is what makes the middle layer taste like dessert instead of plain gelatin; the sweetness and richness are essential.
- Blue Jello (3 oz box, blue raspberry): The final layer, and blue raspberry stays true to the fruity theme without tasting artificial when balanced with the other flavors.
- Whipped cream and berries (optional garnish): These push the dish from simple to special without requiring any extra baking or complicated decorating.
Tired of Takeout? 🥡
Get 10 meals you can make faster than delivery arrives. Seriously.
One email. No spam. Unsubscribe anytime.
Instructions
- Set up your stage:
- Line up eight clear cups and grab your muffin tin—you'll use it to tilt the cups at an angle for that first layer. Having everything ready before you start means you won't be scrambling while the Jello is still warm.
- Create the red foundation:
- Dissolve the red Jello in boiling water, watching it disappear into crystal clarity, then stir in cold water. Divide it evenly (about two tablespoons per cup) and carefully position each cup in the muffin tin at an angle, creating a little lean that'll make the layers look intentional.
- Chill and be patient:
- Forty-five to sixty minutes in the fridge—this is where most people fail because they get impatient. You'll know it's ready when you tap the cup and the Jello jiggles but doesn't ripple like a liquid.
- Build the creamy white layer:
- Sprinkle unflavored gelatin over cold water and let it sit (this is called blooming, and it's non-negotiable). Add boiling water and stir until completely dissolved, then cool it to room temperature before stirring in the condensed milk—adding hot gelatin to cold milk creates texture issues.
- Add white and straighten up:
- Once the red layer is set, gently pour the white mixture over it—if you pour too fast, it'll sink right through. Set the cups upright now and give them another forty-five to sixty minutes to firm up.
- Finish with blue:
- Dissolve the blue Jello in boiling water, stir in cold water, and let it cool to room temperature so it won't melt your white layer. Pour gently over the set white layer, then refrigerate upright for at least two hours—this final layer needs time to set completely.
- Garnish and serve:
- Top each cup with a dollop of whipped cream and a scattering of fresh berries right before serving. This keeps them looking pristine and adds a fresh contrast to the sweetness.
 Pin It
 There was a moment at my friend's garden party when someone took a photo of these cups lined up on the table, and it became her go-to image for that whole summer. It struck me that food isn't just about taste—sometimes it's about creating a moment people actually want to remember and capture. That's what these cups do.
The Angle Trick That Actually Works
The muffin tin angling trick isn't just for show—it serves a real purpose. When you chill the first layer at an angle, it sets with a little lean that makes each striped layer appear deeper and more intentional when viewed from the side. I discovered this purely by accident when my muffin tin knocked over mid-chill and I had to prop the cups back up at an angle, and suddenly they looked restaurant-quality instead of homemade. Now I do it deliberately, and people always comment on how the layers seem to float.
Flavor Combinations Worth Exploring
While red, white, and blue is the classic patriotic combination, the beauty of this recipe is how swappable it actually is. I've made lime-vanilla-lemon versions for spring parties, orange-white-grape for Halloween, and even tropical versions with pineapple, coconut, and blueberry. The technique stays exactly the same—you're just playing with color and flavor. The white condensed milk layer acts as a perfect neutral palette cleanser between any two colored Jello flavors, so you really can't go wrong once you understand the basic structure.
Storage and Make-Ahead Strategy
These cups actually improve when made a day ahead, as the flavors meld and the texture becomes even more set and perfect. You can refrigerate them for up to three days before serving, and I always cover them loosely with plastic wrap to prevent them from picking up fridge smells. If you're making these for a party, prep them the night before and wait to add the whipped cream and berries until just before guests arrive so everything looks fresh and bright.
- Make them up to three days in advance and cover loosely with plastic wrap in the refrigerator.
- Add whipped cream and fresh berries only right before serving to keep the topping pristine.
- Transport them carefully in a rigid container on a flat surface to avoid jostling and separating the layers.
 Pin It
 These layered cups have become my go-to party dessert because they deliver joy that's completely disproportionate to the effort required. Every time I make them, someone asks for the recipe, and I love that I can hand it over knowing it's absolutely foolproof once you understand the patience part.
Recipe FAQs
- → How do you achieve sharp, distinct layers?
Allow each gelatin layer to fully set in the refrigerator before carefully pouring the next layer on top. Using a muffin tin to angle cups slows spreading for clean stripes.
- → Can I swap flavors in the red and blue layers?
Yes, fruit-flavored gelatins like strawberry, cherry, or blue raspberry can be substituted according to your preference without affecting the layering process.
- → What is the purpose of sweetened condensed milk in the white layer?
Sweetened condensed milk adds a creamy texture and sweetness, creating a rich white layer that contrasts with the vibrant gelatin colors.
- → Are there dairy-free alternatives for the white layer?
Yes, coconut milk combined with sugar can be used instead of sweetened condensed milk to create a dairy-free creamy layer.
- → How long should the cups chill before serving?
The layered cups need at least 4 hours of refrigeration, allowing each layer to set properly, with the final blue layer chilled for 2 hours or more.
- → What utensils are recommended for layering?
Use clear cups for visibility, a whisk or spoon for stirring gelatin, and optionally a muffin tin to hold cups at an angle during initial setting.